
The Key Image
Mapping the terrain vague of the A-level Photography Personal Investigation.

There’s a moment, usually in the Spring of Year 12, when an A-level photography student faces the issue of identifying a clear focus for their Personal Investigation. They can photograph anything. The brief is open. And precisely because it’s open, they often don’t know where to start. There’s also the essay to consider, a parallel critical study of 1-3000 words. The course may have begun with some induction exercises, especially useful for students new to photography. For example, we use the 13 ways to begin a photography personal investigation resource. We do some technical workshops, run a couple of trips, mess about with different kinds of cameras, play in the darkroom and ask students to make a zine and/or photobook. We immerse them in making photographs; as many different kinds as possible.

After Christmas, it’s time to focus more closely on their emerging investigations. Some students have a clear idea. Portraiture, landscape, family. They hit the ground running. Others cycle through possibilities for weeks, starting projects and abandoning them, never quite committing. By half term they’re anxious. By Easter they’re desperate. The freedom that seemed like a gift has become a trap.
This post describes a tactic I’ve used recently to help students focus without foreclosing possibility. It borrows the format of the Component 2 externally set assignment and asks students to write their own prompt, as if the exam board had set it, but tailored to their own interests. The aim is to give the investigation shape and direction from the outset, while leaving room for the unexpected.
Photography is a vast field. You can photograph people, places, objects, events, ideas. You can work in colour or black and white, digitally or on film, in the studio, darkroom or out on the street. You can make portraits, documents, abstractions, narratives, typologies. This abundance is part of what makes photography exciting to teach. But for a student beginning a year-long investigation, it can be overwhelming. I know some colleagues who respond by narrowing the options, giving students starting points, perhaps recycled from previous Component 2 papers. This can work, but it risks producing investigations that are dutiful rather than personal. Others stay hands-off, trusting that students will find their way. This can also work, but some students never do find their way, and spend the year drifting. I’ve tried both approaches.
I prefer a middle ground. The student proposes something that genuinely interests them, then formalises it using the language and structure of an exam board prompt. It’s almost like tricking yourself into believing you’ve had a limited choice. The constraint is self-imposed, but it’s still a constraint, and constraints are generative.
Stage 1: The one-sentence summary
I begin by asking students to imagine that their Personal Investigation is like one of the Component 2 prompts provided by the exam board. We have a look at some examples together.
Here’s my favourite from last year’s (AQA) paper:
Divided or joined
Photographers and filmmakers sometimes divide their compositions into sections or join parts together. In his video installations, Douglas Gordon often juxtaposes multiple screens to present alternative or contrasting viewpoints simultaneously. In the series Black Country Type, Tom Hicks often used strong horizontal or vertical lines to present views of urban environments separated into sections. In the 1968 film The Thomas Crown Affair, directed by Norman Jewison, the screen splits into many frames that emphasise repeated movements seen from different distances.
Investigate appropriate sources and produce your own response to Divided or joined.
I ask the students to reflect on what interests them in photography. This could be:
Conceptual (e.g. Divided or joined)
Technical (e.g. Focus)
Formal (e.g. Circles)
Genre-based (e.g. Self-Portraiture)
Thematic (e.g. Urbanisation)
Or, more often, a combination of several. The categories aren’t rigid. They’re starting points for thinking.
Then I ask them to write one sentence summarising what they think their Personal Investigation might be about. Just one sentence. This is harder than it sounds. Students want to keep their options open, to say “I’m interested in lots of things.” The single sentence forces a commitment, even a provisional one. It doesn’t have to be profound. Just a straightforward statement about how they like to make photographs and what intrigues them.
Here’s my own example:
I am interested in taking walks through cities with a camera, noticing in-between spaces and the way that light transforms even the most unspectacular of surfaces.
This sentence will change as the investigation develops. It’s a starting point, not a contract. But it gives me something to push against, a direction to head in, a reason to say no to some possibilities and yes to others.
Stage 2: The prompt
Next, I ask students to look at one of the previous year’s Component 2 prompts, whichever one appeals to them most, and study its structure. Then they write a prompt for their own Personal Investigation, adapting that structure to their interests.
The format I suggest:
A title (one or two words, perhaps done last)
An opening sentence (or two) summarising the theme, issue, or territory
A short paragraph referencing three photographers and (ideally) a particular body of work, showing how each one responds to the chosen theme
A list of additional photographers whose work they may explore as part of their investigation
Here’s my example:
Terrain Vague
Photographers often explore the ‘terrain vague’, the indeterminate, marginal, and unproductive spaces of the urban environment. Rather than focusing on human activity, they document the silence of the outskirts, the ‘dead’ zones of the suburbs, and the physical remnants of past interactions. In the series The Pond, John Gossage transforms a neglected patch of woodland into a sophisticated study of light, texture, and man-made debris. Gerry Johansson, in his rigorous, black-and-white typologies, finds a formal, almost sculptural order in the mundane structures and empty streets of small towns. Through a patient, iterative process, Guido Guidi captures the slow passage of time on the facades and peripheral landscapes of Northern Italy, often returning to the same unspectacular sites to record subtle shifts in light, shadow, and decay.
Investigate appropriate sources and produce your own response to Terrain Vague.
You may also wish to look at the work of:
Mark Steinmetz (South Central)
Teju Cole (Fernweh)
Laurenz Berges (Cloppenburg)
Rahim Fortune (Hard Tack)
Vanessa Winship (she dances on Jackson)
Writing a prompt like this requires research. Students can’t name three photographers and specific bodies of work unless they’ve looked. The task pushes them into books, onto photographers’ websites, into gallery archives. It asks them to make choices and justify them. By the time they’ve written the prompt, they already know more about their territory than they did when they started.
They do this on Google Docs so I can comment on what they’ve written and suggest some revisions/additions.
I’m not bothered if they don’t use this particular format. In fact, I’m always rather pleased if a student says something like, “Do you mind if I don’t do it like that but like this instead?” Do I mind? I’m chuffed. That means they’re already taking ownership. Turning up. Here’s an example of one student’s alternative prompt:
So far I have been taking mainly portraits of my close friends. I have enjoyed this because it allows me to show my subjects parts of themselves that they may not see. I am able to highlight what I see in them that most other people wouldn’t. For example, depicting noise and intensity from individuals that are generally perceived as quiet.
After doing this multiple times, with multiple subjects, I began to analyse links between the photoshoots and the mood I tend to create. I noticed that the traits I generally find myself drawing out of my subject are traits within women and girls that are disregarded or suppressed by society; such as anger, strength, power and intensity. The natural expectation is for subjects to smile. This expectation is especially potent for women and leaches into the everyday rather than just within photography. There is a deeply rooted societal expectation of women to manage and regulate everyone’s emotions around them and all while maintaining a “pretty smile”. Myself and most women have been told at some point to smile (out of context from taking a photo). Whether this is from a stranger or a family member, it is to please and maintain the comfort of those around them.
After reflecting on this, I realised that as a photographer I want to create and provide space for women and girls to exist in their most natural and comfortable self. I want to explore creating a bubble of protection that is able to act as an escape for my subjects from societal pressures and expectations that contaminate so many supposed safe spaces. I aim to create a space where an individual’s value is not constrained to their beauty, and their beauty is not measured by how much they conform and warp their natural self to fit into an unachievable mould formed by patriarchal standards.
Through this theme I also want to take naturalistic candid photographs that celebrate the female relationships that I am surrounded by and how this community has shaped who I am.
Potential Photographers:
Justine Kurland (Girl Pictures), Siân Davey (Martha), Ed Templeton, Larry Clark (Tulsa), Hannah Starkey
Good, isn’t it? Thoughtful, personal, honest, critical. Does it matter that it’s not written like the Component 2 prompt? Not a bit.
Stage 3: The key image
The prompt gives the investigation a verbal shape. The key image gives it a visual anchor.
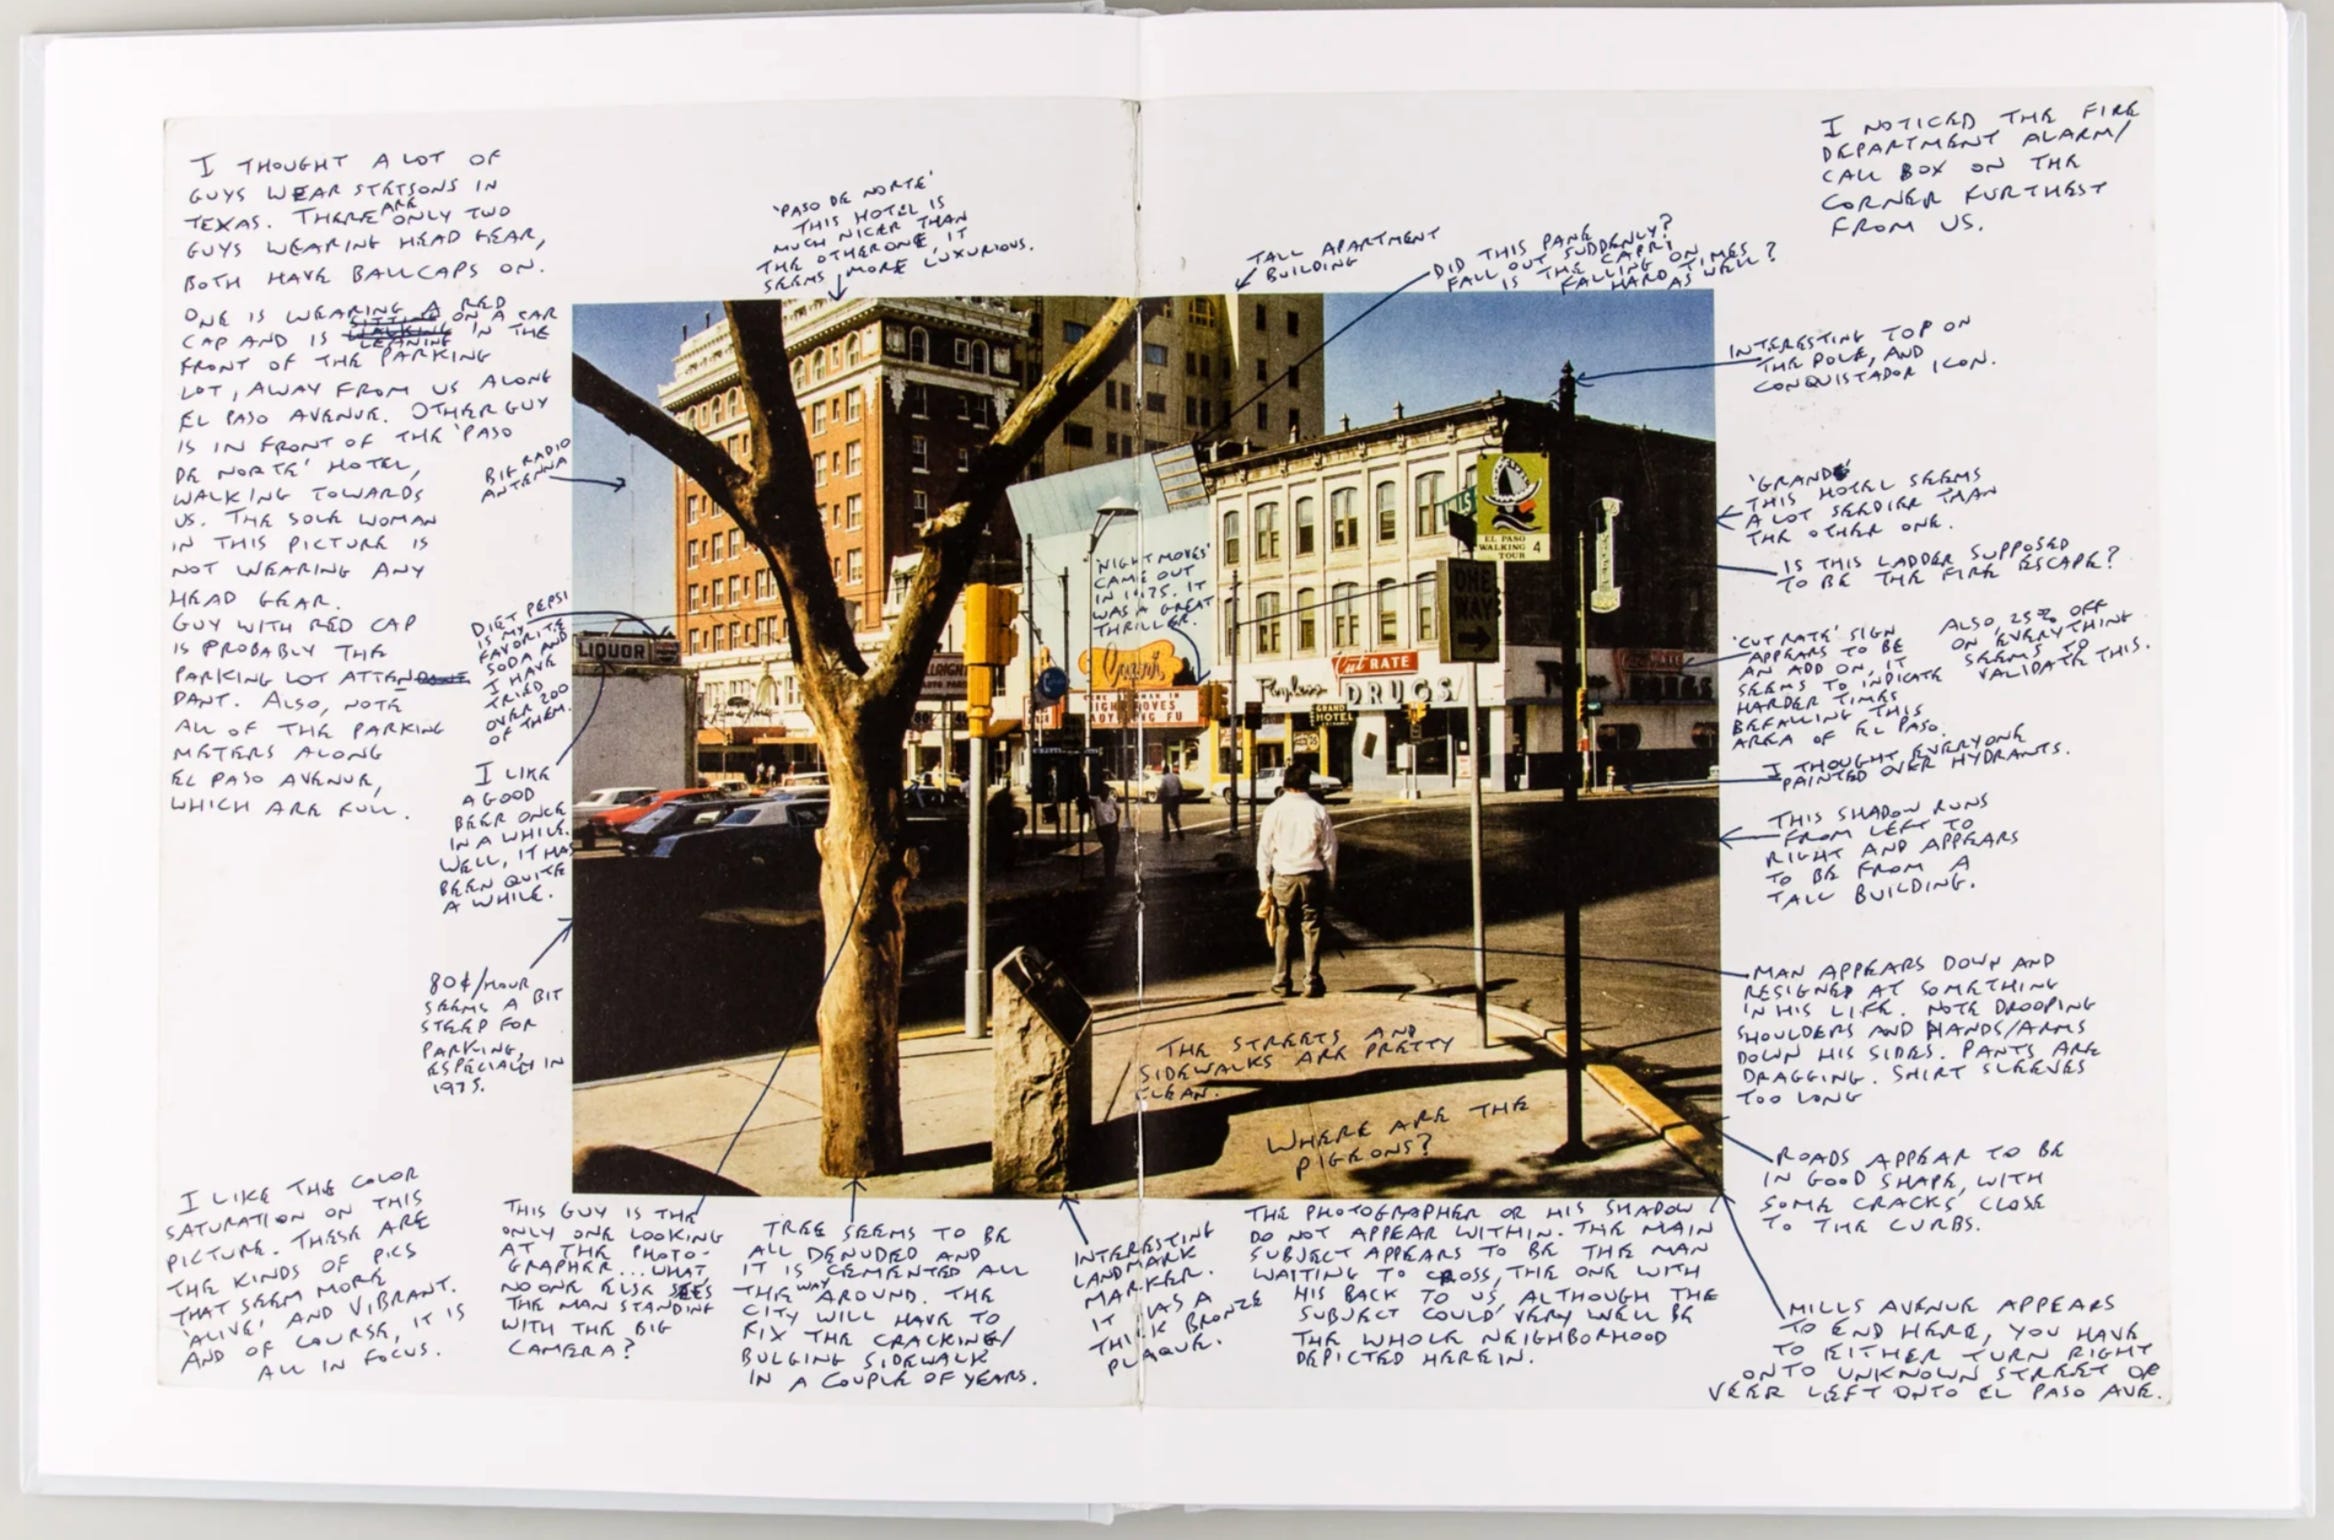
I introduce this stage by showing Nigel Poor’s The San Quentin Project. Poor taught photography at San Quentin prison, where books and cameras were not permitted. Her students worked with archival photographs from the prison’s collection and some canonical images, using them as starting points for personal reflection. The photographs became thresholds, ways into memory, experience and meaning. They initiate slow, careful looking. This is what I want students to understand: a single image can open a world.
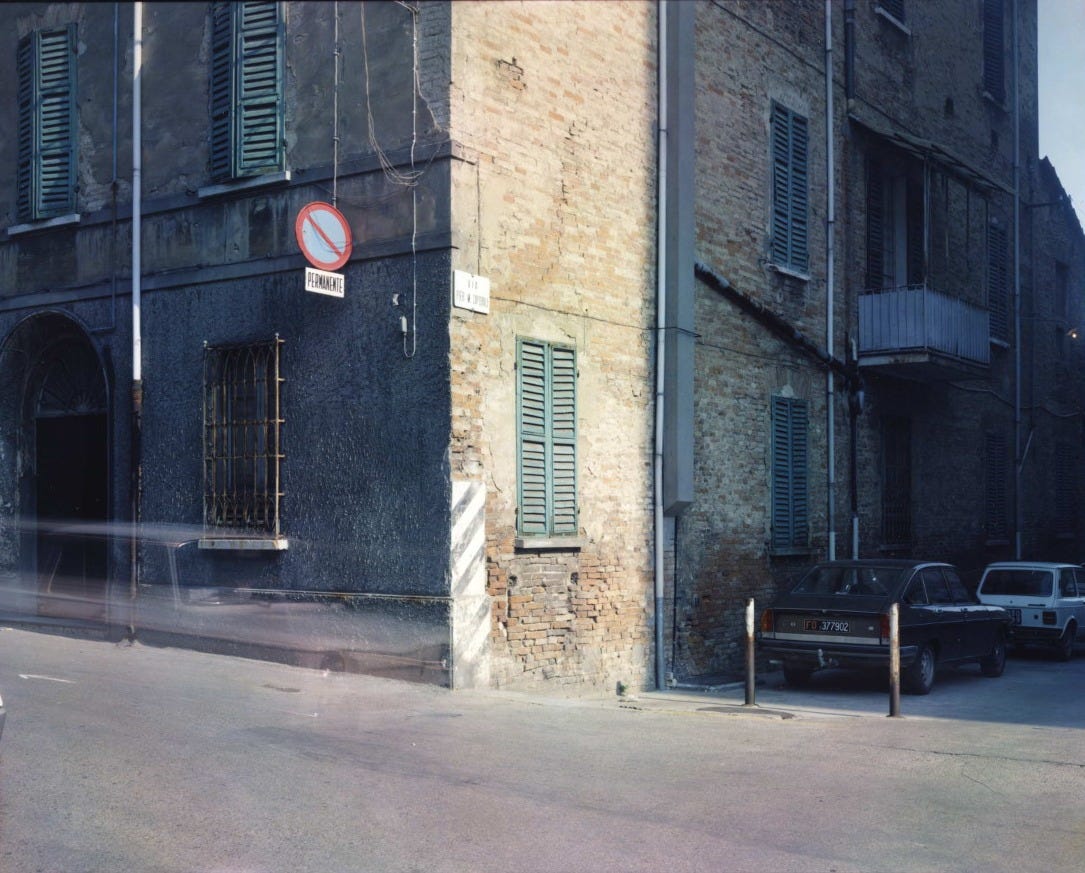
I then hand out an A3 sheet with a photograph at the centre and space around it for annotation. The image I used last week was Guido Guidi’s Cesena #6, 1984, a photograph of a street corner in Northern Italy.
I ask students to annotate the image. Not just label what they see (shutters, car, sign) but notice, associate, question. What ideas or concepts does the image contain? What’s interesting about it? What does it suggest about a particular investigation? What might this photographer be interested in? While they write, I ask questions: Where are we standing? What can’t you see? What time of day is it? What’s the viewpoint? What does it smell like? Why this corner and not another? And then I ask them to imagine that this image is all that remains of someone’s personal investigation. What would it have been about? What was the title?
Five minutes, then discussion. This is important practice for what follows.
Stage 4: Finding your own key image
Now I ask students to do the same thing for their own investigation. Find one key image by a (relatively) established photographer. Not their own work (not yet). Something that helps to explain the focus of their investigation.
Think of it as a map, or a key, or a doorway. How can it be read? What does it open? Where does it lead?
By the end of the lesson, students should have their key image printed on an A3 sheet with an accurate caption: Photographer - Title, Date. Ready for careful annotation in the following lesson.
Practical questions:
Where will you look for your image?
Students should already have named three photographers in their prompt. Start there. The best sources for high-quality images with accurate captions are photographers’ own websites and gallery or museum collections. A Google image search might turn something up, but the results are often poorly captioned, low resolution, and decontextualised. An image from Instagram might be current, but will it stand up to a year of scrutiny? The key image should be one that has stood the test of time, recognised as interesting by the photography community. Something worth spending time with.
What support is available?
Teachers, obviously. But also: books, classmates, reliable Internet sources.
How will you ensure the image is high enough quality for printing?
Check the resolution before you print. If the file is small, the print will be blurry. Photographer and gallery websites usually offer higher resolution images than general search engines.
How will you know the image is correctly captioned?
Cross-reference. If you found the image on one site, check it against another. Photographers’ own websites are usually reliable. Museum and gallery collections are usually reliable. Random blogs and Pinterest boards are not.
I observe their selections and offer support where needed. I collect in the A3 sheets at the end of the lesson.
Stage 5: Writing about the image
The ultimate role of photography as a contemporary language of visual communication consists of its capacity to slow down our fast and chaotic way of reading images.
— Luigi Ghirri
We spend some time annotating our key images. We share what we discover. My own notes (about the Guidi image above) move between description and interpretation, between the specific and the thematic. Verticals parallel to picture frame. Minimal distortion — Observation. Permanence (buildings) vs Impermanence (flux of time) — Interpretation. Is the image a window or mirror? Or both? — A question to carry forward.
We talk about the portal-like quality of a single image. If you rummage around long enough inside it, doors can start opening.
Next, I ask students to turn their notes about their key images into a short piece of writing. A paragraph or two, no more. The aim is to slow down, to commit to observations in full sentences, to discover what they think by articulating it. To combine observation, intuition and research.
I give them a simple two-part structure (which we’ve practised before):
Part 1: What can you see?
Forensic looking. Describe the image as precisely as you can, as if for someone who has never seen it. What’s in the frame? Where is the camera positioned? What’s the light doing? What’s sharp, what’s blurred? What’s in the centre, what’s at the edges? Don’t interpret yet—just look and record. This is harder than students expect. They want to leap to meaning, to say what the photograph is about. But meaning rests on observation. If you haven’t noticed the ghostly blur at the left edge of the Guidi image, you can’t think about what it implies. The discipline of description is the foundation of everything that follows.
Part 2: What can you see once you’ve done some research?
Now interpretation, informed by context. Who is this photographer? When and where was the image made? What body of work does it belong to? What were the photographer’s concerns, methods, influences? How does knowing this change what you see? This stage requires students to read artist statements, interviews, essays, catalogue texts. The research deepens the looking. A student who learns that Guido Guidi returned to the same locations repeatedly, recording subtle shifts in light and decay, will see the Cesena image differently. The patience becomes visible. The photograph stops being a single frozen moment and becomes part of an ongoing practice.
Here’s my own example, writing about the Guidi image:
The photograph shows a corner on a street in Cesena, Northern Italy. The left side of an imposing building is in shadow, making the rendered surface appear a dark grey. The sun picks out a central strip of unrendered brick, light ochre, patched in places, weathered. The far right side of the building falls into shadow again. The green wooden shutters are mostly closed. A no-parking sign is fixed to the front wall, left of centre, and below it a smaller sign reads PERMANENTE. Near the centre there’s a street sign but the text is too small to read. Two cars, one dark and a lighter model, are parked behind two metal poles. A metal balcony juts from the upper floor of the building. Wires trail across the facade. At the far left edge, a pale smear crosses the frame diagonally. A car has moved through the scene during a long exposure. The viewpoint is straight on, the verticals parallel to the picture’s edge, the composition stable and symmetrical. Almost no sky is visible. The light reveals the texture of every surface. There is information in the shadows.
Guido Guidi has spent decades photographing the peripheral landscapes and urban margins of Northern Italy. He most often works with a large-format camera, slowly, often returning to the same unremarkable sites over months or years. He’s interested in the passage of time, the accumulation of weathering, repair, and neglect that marks the surfaces of buildings and streets. The Cesena series, made in the mid-1980s, documents his hometown with the attention of someone who has seen these corners a thousand times and still finds them inexhaustible. Permanente. Guidi often allows movement to register during long exposures, a reminder that the photograph took time to make. Tutto passa. His work is informed by his architectural training, the New Topographics and a wider European interest in the indeterminate, leftover spaces of the built environment. Looking at this image with that context, the ordinary corner becomes a meditation on time, attention, and the quiet persistence of the unremarkable.
I read the student’s paragraphs (shared with me from their Google Drives) and respond accordingly. I might note observations they’ve missed, suggest additional photographers whose work connects to what they’re describing, or propose photographic activities that could extend their thinking.
By the end of this process, students have assembled a small kit for their investigation:
A title (one or two words)
A one-sentence summary of their interest
A prompt, possibly in the exam-board format, naming three key photographers
A key image, printed and captioned
An annotation of that image
A short piece of writing about it
This is their map. It tells them where they’re heading and suggests some routes they might take. It doesn’t tell them what they’ll find when they get there. That’s the work of the year ahead. But they’re no longer standing at the junction wondering about which way to walk. They’ve packed a bag. They’ve chosen a path. They’ve started.
Alongside
In recent years I’ve completed my own Personal Investigations alongside the students. This is about demonstrating that the process is real, that the questions are genuine, that I don’t know the answers in advance either. Doing it all with them reminds me that it’s not easy. When I ask them to do something, set a homework task or suggest visiting an exhibition, I know I’m going to need to do it myself too.
When I sit with the Guidi photograph and ask myself what it opens, I’m not pretending. I’m finding out.
If you try anything like this with your students, I’d love to hear how it goes. What works? What needs adjusting? How do you prepare your class for the Personal Investigation?
These posts will always be free but, if you enjoy reading them, you can support my analogue photography habit by contributing to the film fund. All donations of whatever size are very gratefully received.
I love this format and have not tried it this way. My year 12 students often get very lost at this stage when I’m easing off the direct teaching and handing the ideas over to them to figure out. I used to do a lesson where they had to condense their initial idea onto an A2 mood board with images and annoations in one lesson, I’d pin these up as soon as they made them so we could refer to them as the projects progress. This used to work but it began to feel a bit too pressured and the research would be a bit superficial. I’ll have to give tour way a whirl this year - thanks again for sharing.
Your students are so lucky to have you, Jon. It’s so important for them to understand that language comes in many forms. My son is a visual learner- he struggled terribly with exams as he has slow processing speed. However, visually things come to him quickly & easily. He also did an A level in photography & thrived.